
Oauth Email Configuration
If you have a Networking Department please refer to this department before undertaking these steps
These instructions are provided as an example and for guidence only and detail the steps that BlueFinity undertook to set up an email address with Oauth.
You must ensure you have your Evoke built app is set up on Azure App Registration before you start this process.
These instructions are provided as an example and for guidence only and detail the steps that BlueFinity undertook to set up an email address with Oauth.
You must ensure you have your Evoke built app is set up on Azure App Registration before you start this process.
You will need to use Windows Powershell (in Admin mode) and have access to Microsoft Entra admin center https://entra.microsoft.com/#home to enable access via OAuth to a mailbox.
Registering Service Principals for Your Evoke Web App
Once your web app has been registered, you will need to register your service principal.
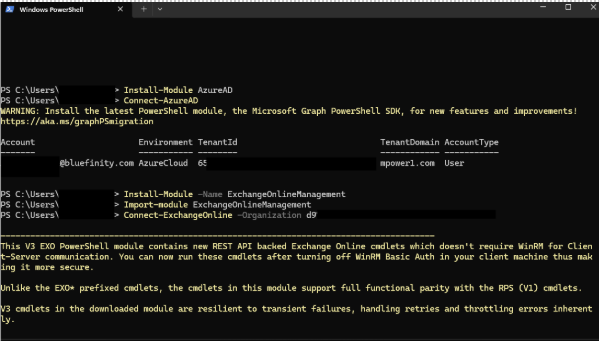
To use the New-ServicePrincipal cmdlet, open a Powershell terminal and install ExchangeOnlineManagement and connect to your tenant as shown below:
Once your web app has been registered, you will need to register your service principal.
To use the New-ServicePrincipal cmdlet, open a Powershell terminal and install ExchangeOnlineManagement and connect to your tenant as shown below:

Text Version for copy:
Install-Module AzureAD
Connect-AzureAD
It is possible Windows Powershell will ask you to install some packages that it needs and to "trust" its repository "PSGallery".
A Microsoft authentication box will show up to authorise your connection to Azure Entra (Active Directory)
A Microsoft authentication box will show up to authorise your connection to Azure Entra (Active Directory)

Text Version for copy:
Install-Module -Name ExchangeOnlineManagement
Import-module ExchangeOnlineManagement
Connect-ExchangeOnline -Organization <tenantId>
The ObjectId is not the one shown in the Entra admin center (App Registrations screen) - to get the correct ObjectId (and the AppId) it can be retrieved using the following command

Text Version for copy:
Get-AzureADServicePrincipal -SearchString 'App Name'

Next, register the Service Principal for your web service:

Text Version for copy:
New-ServicePrincipal -AppId <APPLICATION_ID> -ObjectId <OBJECT_ID>
Granting Permissions for Your Evoke Web App
In order to grant permissions for your web app to access an Office365 and/or Exchange account, you'll need to first get the Service Principal ID registered in the previous step using the following command:

Text Version for copy:
Get-ServicePrincipal | fl
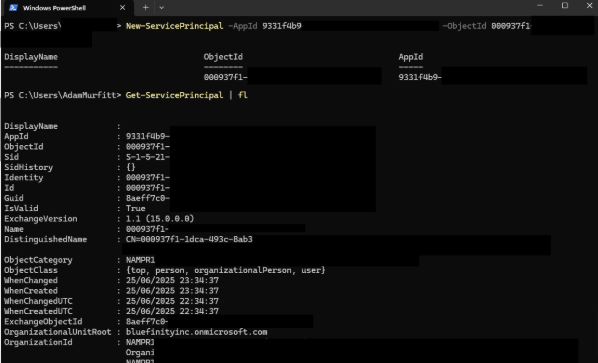
Once you have the Service Principal ID for your web service, use the following command to add full mailbox permissions for the email account that your web app will be accessing:

Text Version for copy:
Add-MailboxPermission -Identity "john.smith@example.com" -User <SERVICE_PRINCIPAL_ID> -AccessRights FullAccess

Now go to the Microsoft Entra admin center https://entra.microsoft.com/#home to get and create your client ID and Secret ID (listed as 'value' not the 'secret id' in entra).
You will also need to Access the API Permissions of the App Registration and add a permission for "SMTP.SendAsApp" to grant 'Application access for sending emails via SMTP AUTH'.
You will also need to Access the API Permissions of the App Registration and add a permission for "SMTP.SendAsApp" to grant 'Application access for sending emails via SMTP AUTH'.
Your OAUTH email configuration should now be complete.