
Deployment of Web Apps

The two Visual Studio folders generated by Evoke (RepositoryAccess and Web) that are located on your computer in the file location specified in "target folder" (see screenshot on right) must be copied to the web server you will use to host your web app.
When the folders have been copied to the web server it is good practice to edit the file web.config located in the web folder. There are several editing tools that can edit this file including Notepad or Notepad++. An image of the web.config file appears below, click on the file to open a larger image.

The parameter Compilation debug="true" (highlighted) is automatically set by Visual Studio when you initially build your app, setting this to "False" will dramatically reduce the size/footprint of your app.
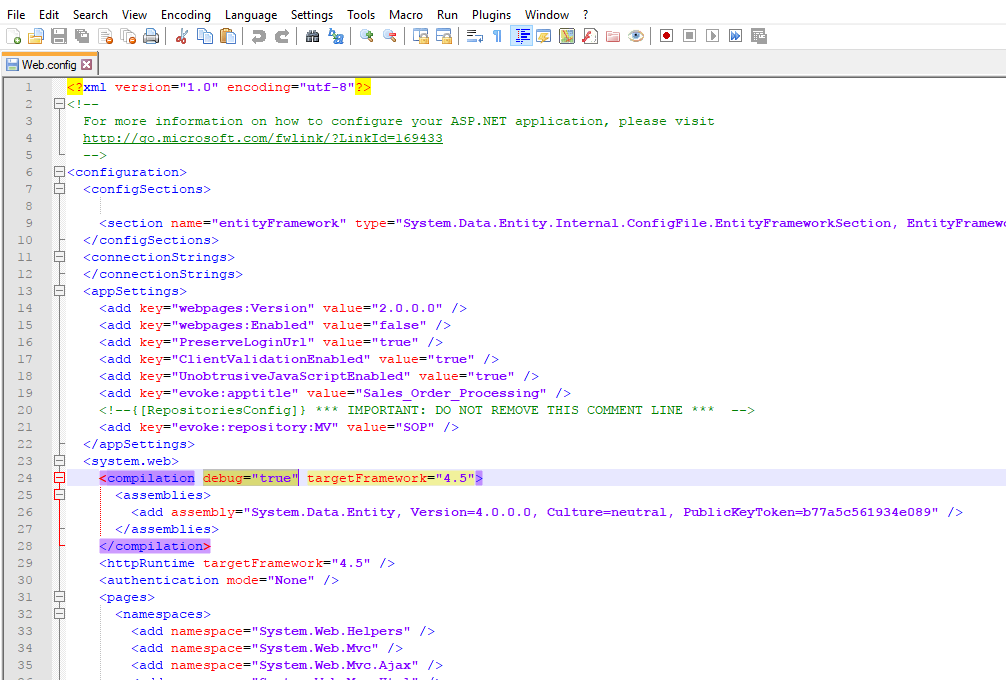
The parameter Compilation debug="true" (highlighted) is automatically set by Visual Studio when you initially build your app, setting this to "False" will dramatically reduce the size/footprint of your app.
In order for users to access your web app you will need to have a URL that users can enter into their browsers (i.e. https://www.appevoke.com/ExampleApp). This will require setting up of 'A Records' as part of the 'DNS' records on the web server (the 'appevoke' part of the example shown this is often your company name or existing website name). If you have not done this before we suggest reviewing the documentation from your web server hosting company where you will find information similar to this web help from the company GoDaddy or if the server is internal then talk to you IT department.
 Your web server computer will need to have Internet Information Services (IIS, formerly Internet Information Server) installed. This is an extensible web server created by Microsoft and is pre-installed and bundled with all Microsoft operating system products so it will almost certainly be present, however, it is possible you might need to 'turn it on'. If you need to turn it on the process is a) access the windows "control panel" b) access "programs and features" section c) click on "turn windows features on or off" d) scroll down to 'Internet Information Serices' and check the boxes for 'web management tools' and 'world wide web services'. Overview configuration instructions to configure IIS are available at this IIS link.
You will need to set up a domain name binding so that the URL is directed to the web server and finds it's way to the 'web' folder (part of your app) that you have copied onto the web server i.e create an application in IIS that points to the folder location. There are several ways to do this however the easiest way to set up the application within IIS is to install Visual Studio on the web server and then open your App Solution (in the two folders, repository access and web, you copied to the web server) within Visual Studio, right click the web folder and select Properties (see the screenshot on the right). In the Web section (see list on left of screen), make sure in the server section "Local IIS" is selected and you have added a name in the "Project URL" area (see image on the right). Click the "Create Virtual Directory" button on this page and your IIS virtual directory, with the link to your 'web' folder is added.
BlueFinity very strongly recommends that you purchase and use an SSL certificate for the relevant domain name (this provides for an https:// web address as opposed to an http:// address) to ensure that all browser traffic to your web app is secure. This may be purchased from your domain registrar, however a Google search will also be able to guide you.
If you are uploading images or documents (i.e. photographs/print documents/reports) to the web server you will also need to ensure that the relevant folder has write access security on the web server (as it would have had on your test server).
Finally, it is important that the database that the app will access is accessible from the web server (MultiValue databases will require mv.NET or similar installed on the web server) and that if you have been using a test database then you have re-generated your app design pointing to the live database.

You will need to set up a domain name binding so that the URL is directed to the web server and finds it's way to the 'web' folder (part of your app) that you have copied onto the web server i.e create an application in IIS that points to the folder location. There are several ways to do this however the easiest way to set up the application within IIS is to install Visual Studio on the web server and then open your App Solution (in the two folders, repository access and web, you copied to the web server) within Visual Studio, right click the web folder and select Properties (see the screenshot on the right).

BlueFinity very strongly recommends that you purchase and use an SSL certificate for the relevant domain name (this provides for an https:// web address as opposed to an http:// address) to ensure that all browser traffic to your web app is secure. This may be purchased from your domain registrar, however a Google search will also be able to guide you.
If you are uploading images or documents (i.e. photographs/print documents/reports) to the web server you will also need to ensure that the relevant folder has write access security on the web server (as it would have had on your test server).
Finally, it is important that the database that the app will access is accessible from the web server (MultiValue databases will require mv.NET or similar installed on the web server) and that if you have been using a test database then you have re-generated your app design pointing to the live database.
Open your Web App in a browser
You can now run your web app within any browsers on any device by having the user enter the URL that you created above i.e. https://www.appevoke.com/SOP (where "https:" indicates that the URL has an SSL certificate (if not use http://), "www.appevoke.com" is the URL that you created with the DNS A-Record above and "SOP" is the IIS Virtual Directory that you created above either in Visual Studio or via another method.)


You can also, if you wish, create an ICON on the home screen of your mobile device (ipad, iphone, Android, etc) or an ICON on your Desktop computer that will automatically run your web app, within a selected browser on your computer, and this is described below. However, this requires each user that wants an icon to individually create one - if you would like to automatically put an ICON for your app onto your users screens then you will need to either a) create a Native App using Evoke or b) use the Evoke App Runner Native App.
Iphone/ipad - Open up Safari or whichever browser you choose and load your web app. At the bottom of the screen you'll see an icon depicting an arrow that looks like it's trying to get away from a square (share/forward/save). Select the option "Add to Home Screen". You'll be asked to choose a name for the homescreen icon. Save and an Icon that links to your webapp, in your chosen browser, will appear on your mobile device screen (as shown on the right).
Android - Open up Chrome or whichever browser you choose and load your web app. Tap the menu button and tap Add to homescreen. You’ll be able to enter a name for the shortcut and then Chrome will add it to your home screen. The icon will appear on your home screen like any other app shortcut or widget, so you can drag it around and put it wherever you like. Chrome for Android (and Firefox) loads the website as a "web app" when you tap the icon, so it will get its own entry in the app switcher and won’t have any browser interface getting in the way.
Desktop (Windows) - Open up Chrome (or another browserif you wish but the options listed here may be slightly different in other browsers) and load your web app. In the options menu "..." Select "More tools" and then "create Shortcut". You'll be asked to choose a name for the homescreen icon. Save and an Icon that links to your webapp (in the chosen browser) will appear on your desktop screen (as shown on the right). If you wish to set the ICON Link to have a different image than the Browser image, right click the ICON and select "properties" and then "change icon".