
Evoke Access Control


When you set up 1) user group access control 2) data based access control or 3) Page Series access control (or any combination of these) for for menu items, page components, properties in a template, etc the access control summary box will show either "Controlled via User Groups", "Controlled via Data" or "Controlled by Page Series" to show that an access control has been set for this menu/page component/etc and which type it is.

Setting Up Access Control User Groups
First you need to define the different user groups you want.
 This is done in App Settings.
Once you have set up some Access Control user groups in App Settings, you will need to allocate users of your App to these user groups. This is done in your database in the AppUser record (AppUser Entity), you can add one or multiple access control user groups to the AppUser record (these should be exactly the same names as you entered in App Settings e.g. Customer, Manager, Salesteam, Accounts Department, etc as shown in the example on the right).
The User Groups in your database should be mapped (in Data Mappings) on to the AppUserGroup property as defined in the Reserved Entities section.
The User Groups in your database should be mapped (in Data Mappings) on to the AppUserGroup property as defined in the Reserved Entities section.
User Groups Based

-
Visible if user is a member of any of these groups
-
Not Visible if user is a member of any of these groups
-
Enabled if user is a member of any of these groups
-
Not Enabled if user is a member of any of these groups
To add a Group, use the + symbol or ellipsis menu option to add a new entry and select from the drop down list of groups that you have entered (set up) in App Settings
Please note that the visible/not visible options are mutually exclusive so if you have selected groups for an item to be visible then any groups in the not visible column will be ignored. The enabled/not enabled options are also mutually exclusive

Data Based user access control works on tests and every menu option, Widget, Segment, etc can have the following Data Based (testing a field/property either input in the UI or retrieved from your database) tests to control its access/display:
-
Visible if any of the tests below are true
-
Not Visible if any of the tests below are true
-
Enabled if any of the tests below are true
-
Not Enabled if any of the tests below are true
To add a Data Source Property Path, use the + symbol or ellipsis menu option to add a new entry and then use the DataSource Builder to select the specific property that you want to test.
Please note that the visible/not visible options are mutually exclusive so if you have selected groups for an item to be visible then any groups in the not visible column will be ignored. The enabled/not enabled options are also mutually exclusive
The tests are are based on a Data Source Property being tested against a test value i.e. a number, letters, {true}, etc based on any of the following Operators:
Operator
Description
=
Is equal to
!=
Is not equal to
>
Is Greater than
<
Is Less than
>=
greater than or equal to
<=
Less than or equal to
]
Starts with
!]
Does not Starts with
[
Ends with
![
Does not End with
[ ]
Contains (case sensitive)
![ ]
Does not Contain (case sensitive)
To invert the result, prefix filter value with '!'
To make content searches case insensitive, prefix value with '~'
To combine result inversion and case insensitive search, prefix filter value with '!~'
Example#1: Age >= 18 Age greater than or equal to 18
Example#2: FirstName ] Jo FirstName starting with 'Jo'
Example#3: LastName!~[son LastName (case sensitive) not ending with 'son'
The initial Filter Criteria field can also include special Evoke system values. Special system values that can be used are:
"$index" For example, an initial filter setting of: $index
< 5 will result in only the first 5 items in the root datasource being contained within the refined datasource (index values are zero-based). The=,>, >=,
< and <=o perators are supported for the $index property.
Examples: If you are testing an alphanumeric field the test may be something like...
Salesdatasource.current.Status = Live or
Salesdatasource.current.Showname = Y
note that you do not need " or ' - just the text
If you are testing an boolean field the test may be something like...
Salesdatasource.current.Live = {true} or
Salesdatasource.current.Live = 1
If you are testing a data field the test may be something like...
Salesdatasource.current.Name = "Bob" or
Salesdatasource.current.Name = {Salesdatasource.current.SalesmanName} (which would test against the contents of the property SalesmanName)
The Test Value field is a free format data entry field but it can also include any of the special Evoke system values, which can be populated by the associated dropdown list. Examples of special system values are:
{true} = a Boolean true value
{false} = a Boolean false value
{blank} = a string with zero length
{empty} = a special "empty" instance of an entity type
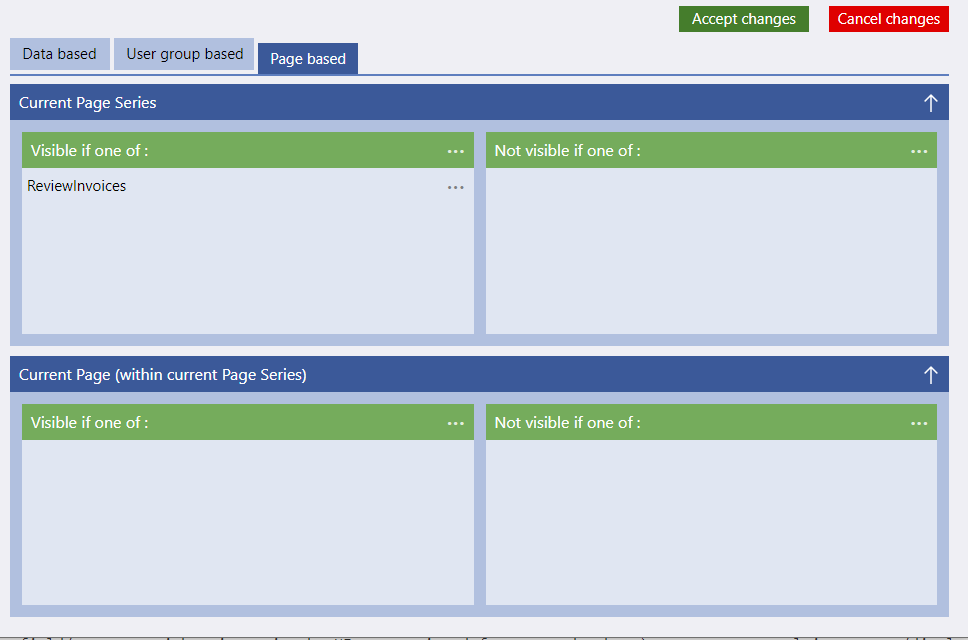
Page Series user access control can be applied to every Widget or Segment, etc. The following conditional tests, based on which page series the test is being conducted in, are applied to control their access/display. This Access Control is very useful when used with linked pages:
-
Visible if any of the tests below are true
-
Not Visible if any of the tests below are true
-
Enabled if any of the tests below are true
-
Not Enabled if any of the tests below are true
To add a Page Series, use the ellipsis menu option to add a new entry and then use the picker to select the specific Page Series or multiple Page Series that you want to test.
Please note that the visible/not visible options are mutually exclusive so if you have selected groups for an item to be visible then any groups in the not visible column will be ignored. The enabled/not enabled options are also mutually exclusive