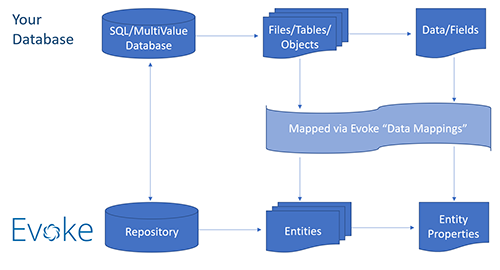
New Evoke users are invited to participate in an "Environment Review" meeting. During the environment review BlueFinity will help check that the Evoke installation has been completed, users can access and use Evoke fully connected to the required databases.
There is also the capability to have your users logon using one database but then switch to another database, that is specific to that user/group of users, and that is covered seperately in the switching databases section of this help.
Definition for Repository Section
-
ID - The name you want to call this data repository within this Evoke app design.
-
Repository Technology - identify the type of database as either a) SQL b) MultiValue or c) Other (a Custom Data Environment)
-
Platform - the 'flavour' of the database e.g. SQLServer, MySQL, Oracle, etc for SQL or jBASE, Universe, D3, mvBASE, etc for MultiValue
-
Connection Type - select, from the dropdown list, the 'Connection Type' (connectivity product/component) you want to use to connect to the database, the selected connectivity product/component may also identify the actual physical location of the database (if you needed to set this up in the connectivity product) and address the security requirements to access it. The connection type connectivity product/component is dependent on the flavour of the database. Examples of the connectivity products are Dynamic DML using ADO.Net or ODP.Net client libraries/Stored Procedures for SQL or mv.Net Core Objects/U2 data client library for MultiValue. Other connectivity products are available. For MultiValue users with mv.NET there are some helpful tips on mv.NET licensing.
-
Connection String (SQL only) - your IT department/DBA may be able to help provide the 'Connection String', although the "Build" button will help identify the connection string components of the Server address, the initial catalog to access and the database user name.
-
Login Profile Name (MultiValue only) - the connection product login profile Account Name (usually the name of your database in the connectivity product)
-
Connection Password (SQL only) - the password for SQL databases that you have previously set for the database that you are trying to access
-
Repository Object Prefix (SQL only) - if your database, uses a prefix for the tables, this is entered here and will be used to prefix the table name
-
Options (ODBC only) - additional, database specific options are entered here i.e. Platform=Informix. The other valid platform options are: sqlserver, mysql, oracle, cache
-
Test Connection - check that the connection to your database repository is set up correctly and that the connection works. This step must show a "successful connnection" for your app to be able to communicate with your database.
If all these things are true then Bluefinity will be happy to assist with an "Environment Review" - please contact evokesupport@bluefinity.com.
A successful connection banner is shown in the image on the right.
If you do not see the "successful connnection" banner then check that the entered password is correct, that you have used the "build" button to enter the the correct connection data in the correct format, that your database is accessable. -
Create default initial database content - as details in the Entities section there are some mandatory files that must be in a database for it to work with an app built using Evoke. In addition, it is often useful to have a couple of other files, that are optional, created to help with starting to build an app design.
The menu item "Create default initial database content" will automatically create these files and their associate data structures in your database. The files that are created are:-
EVLU - A mandatory file, described more fully in the reserved Entities section, that is required for app user licensing.
-
Classification - An optional file created for convienience, described more fully in the reserved Entities section, that holds the static dropdown lists that are used by the app.
-
AppUser - An optional file created for convienience, described more fully in the reserved Entities section, that holds the user records, including login details, for authorised users of the App. This can be changed to be an existing user file that you have or to use the active directory user information.
-
AppUserGroup - An optional file created for convienience, that is part of the standard AppUser file and contains user security information i.e. user groups.
-
-
Download Evoke Utility routines - only applicable to MultiValue databases, if not active/available for SQL databases - downloads to the .net multivalue database connectivity product - mv.NET - the utility routines that are part of the Create, Read, Update, Delete (CRUD) data basic program file.
-
Scan For Repository Objects - Scans the repository and populates the repository objects list with the names of any tables/files that are found in the repository that are available to use in the app design ( see image below right).
-
Repository notes - A free format notes area for you to add any specific notes about your database/repository connection. You may want to keep a password reminder here, indicate the physical location of the database server, as a support number, etc.
Repository Objects/Tables

You can set up as many repository definitions, with connectivity to different databases, as you wish within each Evoke App.


