

New Evoke apps have a default generator profile provided for you as standard (or a starting point), this is called Profile1 and the name can be changed or more profiles added if you wish to map other databases to Entities or files in Evoke.
-
Code Generation - the generation of your app design into a series of files that form a Visual Studio solution
-
Warnings and Errors - correct any warning and erros that are displayed when you generate your code
-
Visual Studio settings - give your visual studio solution a name, identify where on your computer the code you be placed, etc
-
Entity Mappings - select which database profile/physical files this generator profile is using
-
Images - define the favicon and other images for your web app
-
Visual Studio - open your web app in Visual Studio, build it and test it
-
Deployment - deploy your app for others to use it
Code Generation

-
.Net Classic - allows the resultant web app can be hosted in a Windows environment.
-
.Net Core - allows the resultant web app can be hosted in a Linux environment.
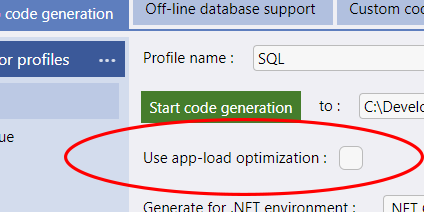
As part of this process Evoke creates a backup copy of the entire Visual Studio solution before beginning to overwrite any files, this is so that if the generation fails to complete for any reason then the Visual Studio solution is reverted back to the state it was in prior to the generation starting and the backup copy removed.
There are several reasons that you may not want this backup copy taken such as a) disk space restrictions b) not having full read/write/delete permissions on that file folder in Windows Explorer, etc. in this case you can select the "Suppress backup" option before a code generation and the backup copy will not be take. Consequently, if the generation fails for any reason then the Visual Studio solution will not be restored to its previous state.
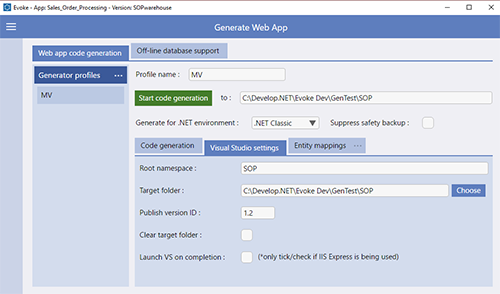
Generate your Web App solution
 button and Evoke will validate your entire App project, displaying both warnings and hard errors that it finds (you will need to correct any errors) and then generate an entire Visual Studio Solution.
Visual Studio Settings
-
Root NameSpace - Namespaces are simply a mechanism Visual Studio uses to help organize your code. By default, the root namespace is the same name as your project.
-
Target Folder - the location, on your computer, where the actual folders containing the Visual Studio solution and projects will be created/stored. Web and repository Folders will be created in this location.
-
Publish Version ID - The version ID of the latest generated deployed app - manually incremented to force a browser cache reload. You are able to display this in your app, if desired, using the AppInfo Reserved Entity.
-
Clear Target Folder - Evoke preserves any customisation that you have added to Visual Studio each time you generate the App. However, there may be times that you wish to clear all customisation automatically when you generate the app.
-
Launch VS on Completion - Evoke can automatically open and load up the App project in Visual Studio so that no Visual Studio actions (other than the build) are required.
Entity Mappings

For each "generator profile" that you set up, it allows you to select a repository (database) against each of the Entities in your app design to allow Evoke to "associate" (map) each Entity (identified in Entities and in Data Mappings) to a specific physical database file.
If you only have one Repository (database) associated with your app then the associated Repository will obviously be the single Repository profile that you have included in your app design.
DataBasic Repository CRUD (MultiValue Databases ONLY)
DataBasic Repository CRUD (Create, Read, Update, Delete) code is only required to be generated for MultiValue Databases. If you are using a SQL database please review SQL repository CRUD and this section can be ignored.
DataBasic Repository CRUD code is used by MultiValue Databases to provide access to the database files (Entities) and create the Selections that you set up against your Entities.

New CRUD code will be generated by Evoke whenever you check the "Generate Repository CRUD" check box, against any or each Entity in the Generate Web App area.
The naming and content of these CRUD routines is based on the Entities you have created in your App Design. Each data entity will be represented by 2 routines called EV.CRUD.xxx and EV.CRUD.xxx.CUSTOM, where xxx represents the name of the data entity.
The EV.CRUD.xxx routine is "owned" by the app generator, that is, you should not amend its content. Conversely, the EV.CRUD.xxx.CUSTOM routine (referred to hereafter as the "custom CRUD routine" is "owned" by you, and will only be modified by the generator once - i.e. when it is first created by the generator.

Using new or existing MultiValue DataBasic with your CRUD code
One of the purposes of the generated .NET code is to invoke the relevant DataBASIC subroutines residing on your MultiValue database server. The specific server-side routine that is called and the data that is passed to it depends entirely upon the type of repository related action that has occurred within the UI.
As described above the Evoke app generator will create the initial content of these server-side CRUD routines and you are then able to add your own code as necessary in order to implement the required database file access logic.

The default implementation of each CRUD action within the EV.CRUD.xxx subroutine is based on the data entity mapping definition set up within the app generator. This mapping data, in essence, defines a logical structure for the "blob" of entity data that passes between .NET and DataBASIC. The knowledge of this structure by both .NET and DataBASIC is obviously crucial because it is the only way in which these 2 environments can successfully synchronize their individual elements of data exchange logic.
Thus, the default implementation of each CRUD action within DataBASIC is based on the assumption that each entity maps onto a single database file, and that the structure of this file is exactly the same as the app generator's mapping definition blob described above. This may be true for some entities, but probably not true for many others. In this latter case you will need to override the default implementation of CRUD actions with your own code within the CUSTOM version of the CRUD routines.
Sometimes it is useful to look at the generated CRUD routine in order to look at an example of how some of the calling signature arguments can/should be used.
A simple example of customising the Evoke generated CRUD code is provided here however, the BlueFinity support team will be happy to assist further.
Images

Visual Studio
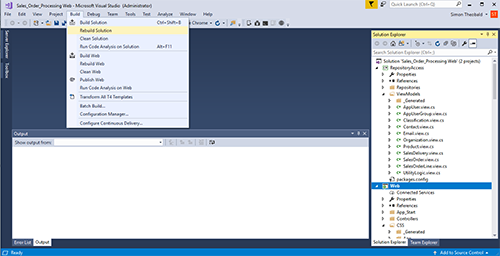
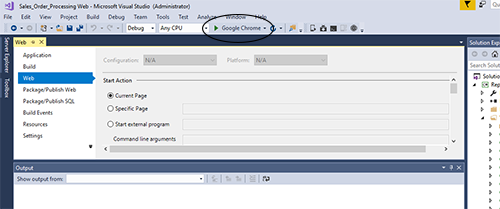
Open Visual Studio and selection the open solution option (or if you have selected "launch VS on completion" in the Visual Studio settings section then it will have automatically opened Visual Studio and your Evoke App solution).
Deployment

Generator Warnings and Errors
